
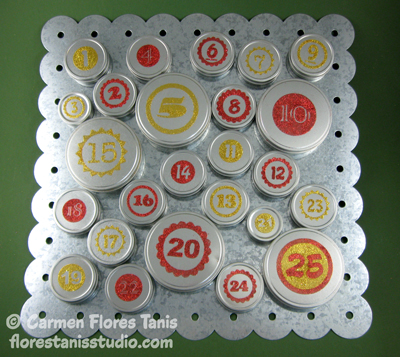

Doesn’t it seem like the weeks between Halloween and New Year’s Day just rush by in a blur going a million miles an hour? That’s why I love Advent Calendars – you can stop for at least a moment on each of the twenty-four days leading up to Christmas to acknowledge the day and celebrate it with a tiny surprise. Some Advent Calendars only have twenty-four little boxes or pockets but this one has twenty-five with the last one decorated extra special to open on Christmas Day. I used my electronic die cutting machine to cut out each of the numbers from a sheet of Kool Tak™ Ultra Clear double sided adhesive but you could also use stencils and a kraft knife instead. Ultra Clear sheets are my favorite – they cut so easily! The metal tins I got at my local wrapping supplies store but any small metal container you have would work well too. Then just fill each of the tins with a little gift like a tiny ornament or favorite treat and you’ve got yourself a fun way to count down the days to Christmas!
Materials:
Kool Tak™ Ultra Clear Adhesive Sheets – 8” x 10” (2)
Kool Tak™ Sparkles Bonus Packs – Gold, Red
25 plain round lidded metal tins- assorted sizes
Metal bulletin board
Magnets
Tools:
Electronic die cutting machine, needle tool, tray to catch glitter
Instructions:
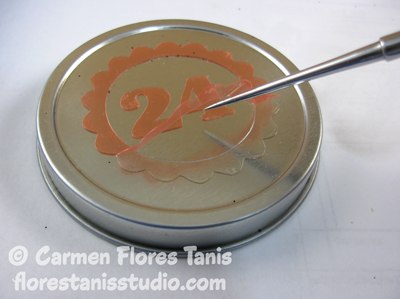
1. Create and size your artwork to fit your metal tins in the graphics program of your particular electronic die cutting machine. Feed a sheet Kool Tak™ Ultra Clear Adhesive into the machine and adjust the cutting settings so that the blade will cut through the pink plastic release sheet and adhesive layer but not through the white paper release sheet. (If you are not using an electronic die cutting machine, you can use stencils and a permanent marker to draw your numbers on the Ultra Clear sheet and then cut them out with a kraft knife.)
2. Peel one set of numbers from the white backing sheet and apply to the lid of a metal tin. Press down. Use the needle tool to remove the clear pink release sheet and expose the adhesive. (I liked the look of the numbers against the plain silver of the tins so I removed the background adhesive areas on all except the “25” tin.)
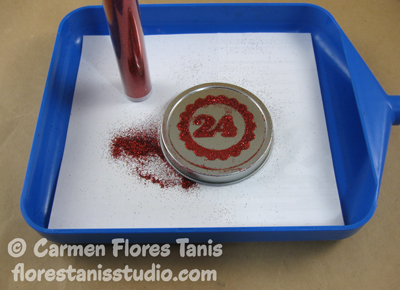
3. To keep things nice and neat, put the lid on a little tray and sprinkle with glitter. Press down on the glitter with your finger so that it adheres well then tap away the excess glitter. Repeat for the remaining lids. **Tip – put a piece of paper on the bottom of your glitter tray before you start glittering. Then when you’re done, pick up the paper carefully and use it to funnel the glitter back into the container.
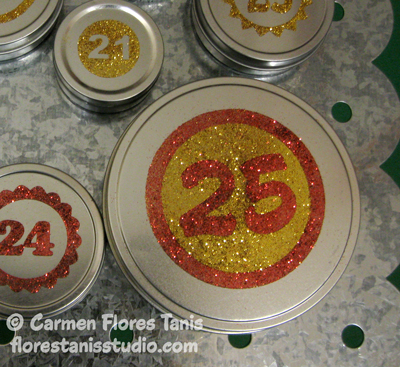
3. To do two-tone glittering on the “25” tin, first peel away the pink release liner of the background and apply gold glitter. Then peel away the remaining pink release liners covering the border and numbers and apply red glitter. Cool huh?!
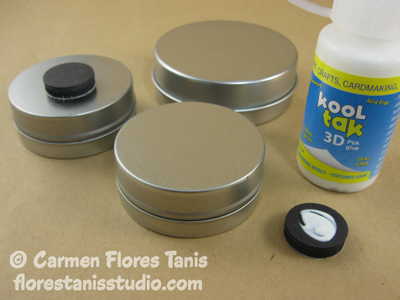
4. Glue a magnet to the back of each metal tin with Kool Tak™ 3D PVA glue. Let dry one hour.
5. Finish up by filling each metal tin with a small surprise and then arrange them all on a metal bulletin board.
You can customize this Advent Calendar by changing up the color scheme, the choice of fonts and the kinds of containers you use (ooooh wouldn’t a collection of old candy tins be cute?)
May your holidays be filled with lots of surprises and joy! Carmen