

Mother’s Day is almost upon us, and I will be missing my mother more than ever. She was such a fashionista, a great cook, a perfect hostess and all the things a mother should be. She also never received a card she didn’t keep, but her storage was in shoe boxes, old purses and ancient wooden jewelry boxes.
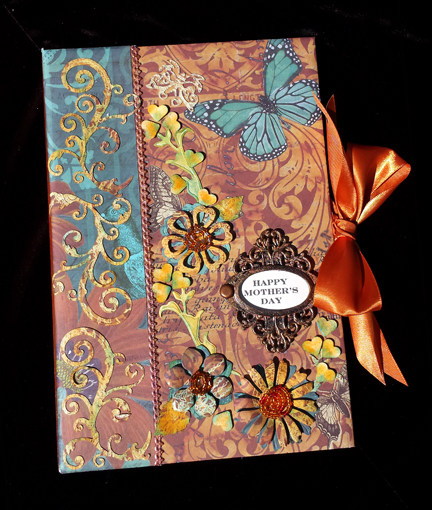
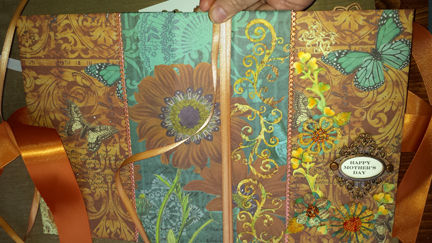
When I began this project, I was leaning towards a pink, ruffled floral thing, but then I realized that that wasn’t my mother. She definitely had a Bohemian streak, so I chose this great paper from K & Company. I’m going to dig out all those cards she saved and place them in a series of these keepsake books. One would never hold them all.
Using Kool Tak™ products gives me the reassurance that these books will still be here long after I’m gone. I just discovered the Kool Tak™ Punch Adhesive sheets. These are fabulous and eliminate the need for waxed paper between the paper and die. The cuts come out clean and sturdy, and I was able to use the swirly die cuts I love without fear of jumbling them into a hot mess.
Supplies
- Kool Tak™ Premium Pro Adhesive, ¼
- Kool Tak™ Ultra Clear Adhesive 1/8”
- Kool Tak™ Punch Adhesive Sheet, 8 ¼” x 11 ½” sheet
- Kool Tak™ Sparkles Bonus Pack Threading Beads, Red
- Kool Tak™ 3D Foam, Clear Foam pads
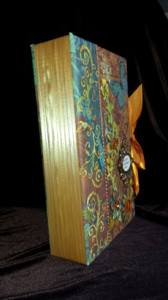
Book Spine

Artistic Wire, 6-8”
Spellbinders Grande Calibur
Spellbinders Dies: Shapeabilities Jewel Flowers and Flourishes
Small Heart Punch
Two pieces of 6”x 9” mat board, book board or heavy chipboard.Note: Any reference to chipboard means cover base.
One piece of 2”x 9” ” mat board, book board or heavy chipboard
Coordinating printed cardstock scraps
Printed cardstock, three sheets 12”x 12”, double-sided(K & Co. Elegant Garden Slab)
Cream cardstock scraps
Trim, 20” (Dresden foil or lace)
Ribbon, 1 roll, 1/4″ or 1/8” width, approximately 10 yards (Offray)
Ribbon, 2” wide, two pieces, 12” long each (Offray)
Computer-generated title
Metal nameplate (Tim Holtz for Ranger)
Tyveck, two pieces, 5”x 9”
Embellishments of your choice
Wooden skewers, 1/8” diameter
Ink pads to blend with printed papers
Sponges for inks
Viva Décor 3D Stamp Paint, Copper
Make Covers
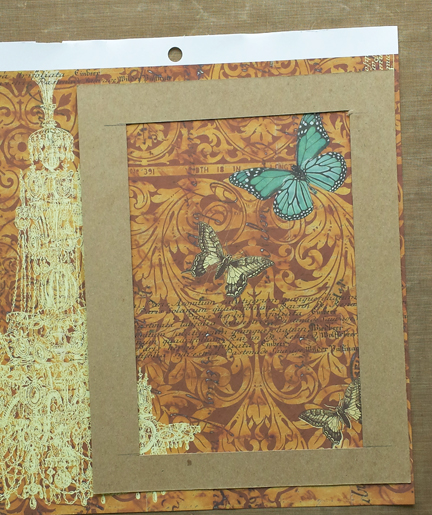
Cut a frame the size of your book cover to help you determine where to cut to get the best portion of the design.
Tips: Folding cardstock around you cover base is easier if you secure the chipboard to the card stock and then score around all the chipboard edges, using your mat board covers as a guide.
Make a frame with the opening the size of your cover and about a 1″ margin. Use this to place on your paper to determine where you want to cut to make the most of the paper design.
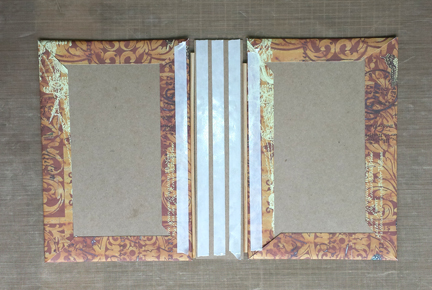
Cut two pieces of 8”x 11” printed card stock. Apply adhesive to mat board and center card stock and score along each edge with bone folder. Cut 45° angles on each corner, being careful to not trim too close to corner. Apply adhesive and fold to inside cover.
Tip: If you cut too much off the corner, you will have white space showing on the corners. Most of this will be covered by the inside covers, but you can use the corners you cut off to cover the white space if you like.
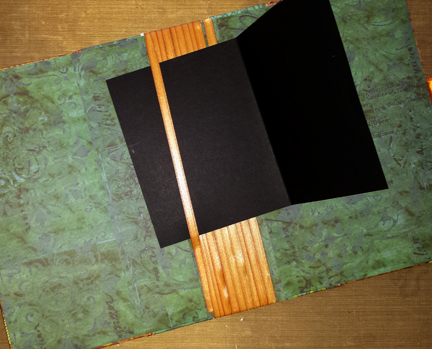
Assembling the Book
Space the covers on either side pf the spine by using skewers between the pieces. When you add the KoolTak Premium Pro, be sure to leave the area above the skewers adhesive-free.
Place covered book covers, front and back down, 1/8” apart on either side of the spine on a flat surface.
Note: Use the skewers to place between covers and spine to keep distance accurate while adhering Tyveck.
Apply Kool Tak™ Premium Pro ¼” adhesive to Tyveck , avoiding the area where the skewers are located, and center top to bottom and side to side on inside spine . Remove skewers.
Flip book so outside covers and bare spine are facing up. Repeat Step 3. This will ensure a good strong hold.
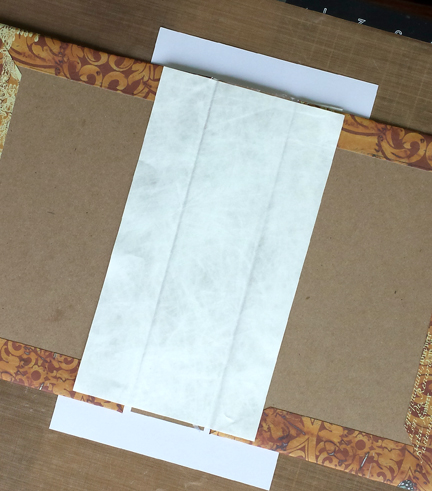
After adhering Tyveck to cover and inside cover, place printed card stock under cover front, centering top to bottom and side to side. Mark the folds top and bottom and cut v-shaped wedges from paper edge to the point where it meets the book cover.
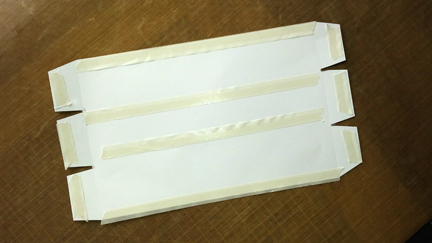
Trim additional printed card stock to 6” x 11 ”. Center it top to bottom and side to side with your book cover on top of the wrong side of the card stock. Mark the spot where the skewers were at the top and bottom of the printed paper on the back side of the printed card stock where you had the skewers and cut a wedge shape at each point. This will make folding it to the inside easier. Add Kool Tak™ Premium Pro to the top and bottom, edges and along both sides of the spine. Remove the release paper and adhere it to the cover spine, folding the top and bottom to the inside.
Attach 2” wide ribbon with strong adhesive to left and right inside covers, centering top to bottom.
Cover the inside center with a piece of printed card stock, 4″ x 8 3/4″. Cut two pieces of printed card stock 5 ¾”x 8 ¾” and adhere to front and back inside covers with Kool Tak™ ¼” Premium Pro.
Embellishing
I embellished the bookplate using a sponge and copper Viva Décor 3D Stamping Paint to tone down the harsh dark color.
Print book title on cream card stock and adhere to bookplate. Add brads and use Kool Tak™ 3D Foam, Clear Foam pads to attach to the cover, placing the side adhesive squares over the brad backs to hold them in place.

Use Kool Tak 3D Clear Foam pads to hold the brads in place and secure the bookplate to the cover.
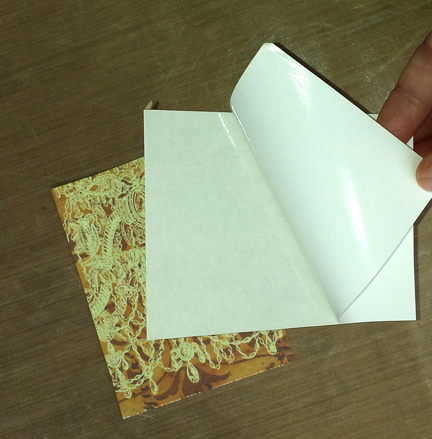
Attach printed card stock to Kool Tak Punch Adhesive sheet. Cut with your die cutter and see how easy it is to add the swirliest of embellishments.
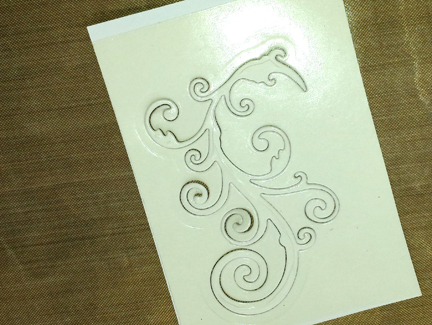
Tip: Swirls should go down first, so you build the cover embellishments from bottom to top. Attach enough printed card stock to the KoolTak™ Premium Punch adhesive to cut as many pieces as you like. Remove the release paper and attach to cover.
Adhere enough card stock to a piece of Kool Tak™ Punch Adhesive Sheet from which to cut your die cuts. Die cut the embellishments, remove the release paper and adhere to book cover.
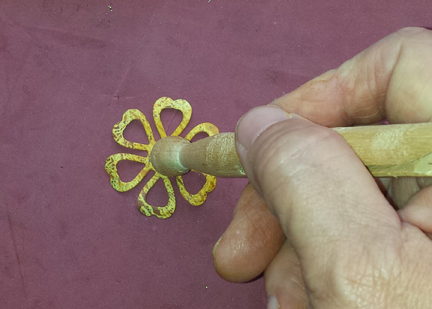
Cut additional flowers from lighter-colored card stock, but do not add the Kool Tak™ Punch Adhesive Sheet. Roll each petal around a pencil or skewer to add curves to the ends.
Punch tiny hearts from cream card stock and tint with ink pads.
On a foam mouse pad or rubber-stamping pad, use the rounded end of a stylus or old-fashioned clothes pin to gently draw invisible circles on the flower centers, causing the petals to raise up. Add these flowers over the darker flowers using a Kool Tak™ 3D Foam, Clear Foam pads.
Place the flowers on a foam surface such as a mouse pad. Draw invisible circles gently in the flower center with a smooth round object.
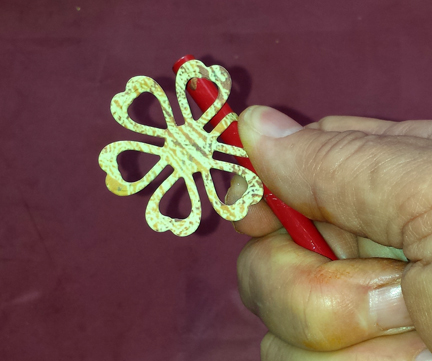
Roll flower petals around a cylinder to curl the points under.
Beaded Flower Centers
Cut about 6” of flexible wire. String on the first bead, wrap the wire around the bead top and slip the next few beads on the wire, covering the wire wrapping. Add additional beads until you have enough to shape the strand into a circle. Wrap the wire end around the bead circle to secure. Adhere to the flower centers with Clear Foam Dots. Continue until you have three flower centers.
Begin wrapping ribbon by adhering the end about 3″ at the top inside cover. Flip the book so the outer spine is showing and wrap the ribbon as many times as you like. Secure the end on the inside with Kool Tak Premium Pro 1/4″ tape.
Attaching Ribbon to Spine
Beginning near the top of the spine and leaving ribbon on the roll, bring the end of ¼” or 1/8″ ribbon down the inside front of the book approximately 3″, adhering with ¼” tape. Loop the ribbon roll over the outside of the book and then back up the inside. Repeat until you have enough ribbon to cover the book spine. Attach the end of the ribbon to the inside spine top with Kool Tak™ Premium Pro ¼” tape. If you want more places for storage, just begin with another roll. The basic book holds about 20 cards.
Finishing
Insert cards with the ribbon on the inside spine.
Adhere foil or lace trim along edge where different papers overlap at front and back, adhering with Kool Tak™ Ultra Clear 1/8″ tape. The foil trim I used was pink, so I added copper Viva Décor 3D Stamping Paint before adhering.
Stamp or print sentiment on cream card stock and attach with nameplate to cover, using Kool Tak™ 3D Clear Foam pads.
Insert cards onto inside loops of ribbon with largest cards in the back.
That’s how I did it. I think it took me longer to select my papers than it did to create the entire project. Once you’ve made a couple of these, they will come to you without reading directions. Imagine how pleased your friends would be to receive these as birthday gifts, wedding gifts or Christmas presents. Just change the occasion by changing the title.
I hope you have a wonderful Mother’s Day with your mom, and if she’s with my mom, I hope they enjoy a tea party together. – Candice