
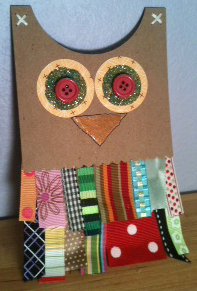
Owls are all the rage! Honestly, who doesn’t love them? Today we are sharing with you how to make this adorable owl card created by Beth Watson. Learn how to make your own handmade card by following the instructions below.

Materials:
- Kool Tak™ Ultra Clear Adhesive Sheet – 8” x 10”
- Kool Tak™ Premium Extreme 1”
- Kool Tak™ Punch Adhesive Sheet – 4” x 6″
- Kool Tak™ Sparkles in Green or Blue
- Kool Tak™ Shiny Transfer Foil Sheets (Earth Tones)
- Kool Tak™ Clear Foam Adhesive Pads
- Kool Tak™ Artist Tape ¼”
- Kraft Cardstock 4” x 12” & 4”
- Crate Paper Acorn Ave Collection in Nut Diner
- Ribbon Scraps 1 ½” long (15-20)
- ¼” Buttons (2)
- Embroidery Floss in White and Needle
Tools:
- Kool Tak™ Layer Plus Tool
- Straight Scissors
- Scallop Edge Scissors
- Piercing Tool
- Circle Punch 3” and 1 ¼”
- Sizzix Bigz Die 1” Circles
- Sizzix Big Shot Machine
- Bone Folder
- Permanent Pen
Instructions
1. Cut a 4” x 12” strip from Kraft cardstock, fold in half. Cut a 4”x 4” square from Kraft cardstock, cut one edge with scallop scissors. Layer square on top of card and punch out half of a 3” circle punch from top.
2. Line up 1” wide Premium Extreme with bottom edge of card, trim and peel liner. Randomly place scraps of ribbon side by side and let hang over the edge of the card. Place a second strip of 1” wide Premium Extreme above the first strip. Peel off the liner and cover with ribbons, overlapping the bottom row of ribbons.
3. Cut out a 3” x 2” piece of Punch Adhesive Sheet, cover it with same size Nut Diner paper and punch two 1 ¼” circles, side by side, with punch. Set aside.
4. Die cut two 1” Circles from the UltraClear Adhesive Sheet. Peel liner on one side and attach to the scrapbook paper circles you set aside. Use Layer Plus Tool for exact placement. Remove the liner from the top of the circles to expose the adhesive. Press the adhesive firmly into a small plate of Sparkles Glitter, making sure to cover the whole area. Shake off excess.
5. Peel liner from the back of the scrapbook paper circles and attach to top center of 4” x 4” scalloped-edge face of the owl for eyes. Use the Layer Plus Tool for exact placement.
6. Finish the eyes by attaching a ¼” button of your choice to center of each circle with a Clear Foam Adhesive Pad. Press firmly for strong bond.
7. Cut a triangle from 1” wide Premium Extreme, remove liner from one side and attach, tip down, below the eyes, to 4” by 4” square as the beak. Peel off the liner and cover beak with Shiny Transfer Foil, grey side down/color side up, by burnishing with bone folder and then lifting foil sheet away.
8. Line up Layer Plus Tool along top left side edge of square and pierce 4 holes. Repeat along top right edge. Thread white floss on needle and stitch two X’s using pierced holes. Secure each end to back of square with a small piece of Premium Extreme – do not peel liner.
9. Place six (6) Clear Foam Adhesive Pads on back of square and attach to front of card.
10. Additional tip: To personalize your card, measure and cut a 4” length of ¼” Artists Tape in the color of your choice and attach to square just above scallop edge using Layer Plus Tool for exact placement. Write sentiment on Tape with permanent marker.