
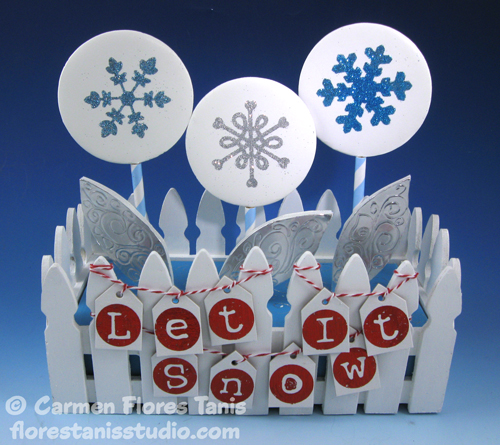

Who says you can’t have a garden full of flowers in the winter? Well with this sweet project you can have snowflake flowers year round! This snowflake flower box table topper is fun to make. This project uses some of my most favorite materials – foam core, wooden skewers, embossing metal and Kool Tak foils, glitters and adhesives. You can almost hear the snow falling!
Materials:
Kool Tak™ Ultra Clear Double-Sided Tape – 1/4″ x 16 yards
Kool Tak™ Punch Adhesive Sheets – 4 1/8″ x 6″
Kool Tak™ 3D PVA glue with fine tip
Kool Tak™ Sparkles Bonus Pack – Blue
Kool Tak™ Shiny Transfer Foil Sheets – Carnival
Wood picket flower box
Smoothfoam™ block – to fit inside your flower box
Acrylic paint – white
Aluminum embossing foil
White foam core
White chipboard
Blue card stock
Wooden skewers
Baker’s twine – red & white
Paper straws – blue & white striped – available in the cake section of the craft store
Tools:
Hot wire foam cutting tool, kraft knife / mat, scissors, paintbrush / plastic plate, die cut machine with dies – circles (including a 3” one), snowflakes, circle letters, tags; plastic container for mixing glitter, tray to catch glitter, embossing tool, needle tool
Instructions:
1. Paint the wood flower box with white acrylic paint. Set aside to dry.
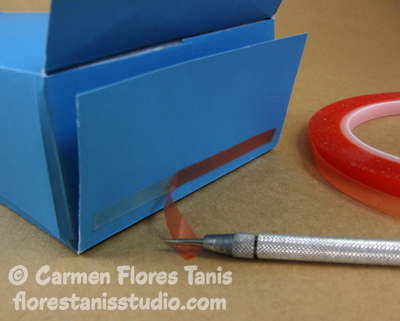
2. Trim the Smoothfoam block with the hot wire foam cutting tool to fit snugly inside the box. Wrap the Smoothfoam with the blue card stock and secure with strips of Kool Tak Ultra Clear Double-Sided Tape. Tip: Use the needle tool to remove the clear pink release sheet and expose the adhesive.
3. Fit the fine tip on the 3D PVA glue bottle. Squeeze the bottle gently as you curly squiggle on the topside of the Smoothfoam block. Let the glue dry until it turns clear.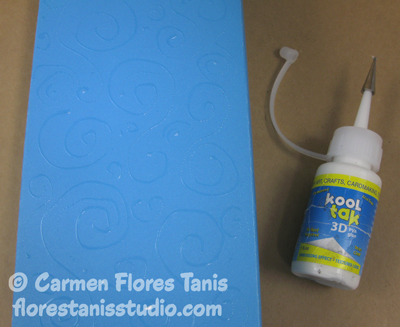
4. Apply a sheet of silver foil (shiny side up / dull side down) to the glue and rub well. Peel off and now you’ve got shiny silver squiggles! Finish foiling the rest of the Smoothfoam block then fit the block into the wood flower box. Save all the foil sheets because you can use every last bit of them.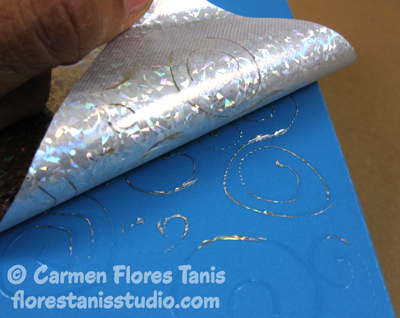
5. Die cut nine small tags from white chipboard. Die cut the letters “Let It Snow” from a Kool Tak Punch Adhesive sheet placing the sheet shiny side down onto each die. Starting with the letter “L”, peel the dull paper release liner to expose the adhesive and press it onto a small chipboard tag. Trim the tag a little shorter if necessary then apply red foil. Repeat for all the remaining letters. Use baker’s twine to tie the tags to the wood flower box. Tip: Use dots of Kool Tak 3D PVA glue to secure the knots in the twine when you tie it off.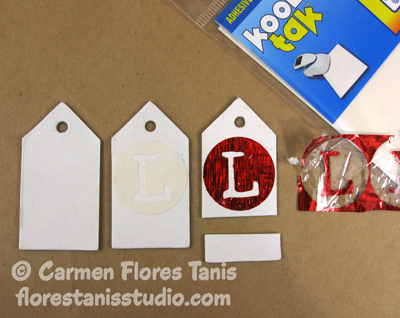
6. Use the die cut machine to cut three 3″ foam core circles. Die cut three snowflake shapes from a Kool Tak Punch Adhesive sheet placing the sheet shiny side down onto each die. Peel the dull paper release liner to expose the adhesive on a snowflake and press it onto a 3″ foam core circle. Repeat for the remaining two circles and snowflakes.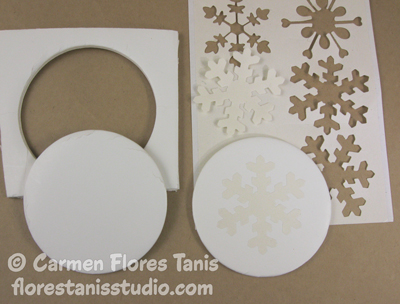
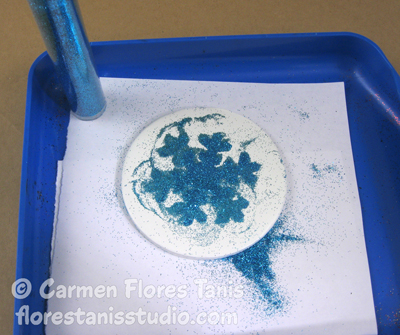
7. To keep things nice and neat, put a piece of paper on the bottom of your glitter tray before you start glittering. Put a foam core snowflake circle on the tray and peel away the shiny release sheet to expose the adhesive. Sprinkle with blue glitter. Press down on the glitter with your finger so that it adheres well then tap away the excess glitter. Pick up the paper carefully and use it to funnel the extra glitter into an empty plastic container. Repeat for the next snowflake circle this time using silver glitter. Funnel the extra silver glitter into the same plastic container where you put the extra blue glitter.
8. Shake the plastic container to mix the blue and silver glitters. Now you have a silver blue color! Apply to the third snowflake circle.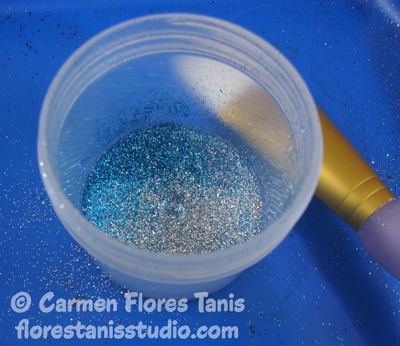
9. Poke a wooden skewer into a snowflake circle to make a flower stem. Check the height in the wood box and trim as necessary. Thread a paper straw onto the skewer and trim to fit. Repeat for the remaining two snowflake circles. Poke the stems through the blue card stock and into the Smoothfoam block in the wood flower box arranging them to your liking.

10. Cut three leaf shapes from foam core using the kraft knife and mat. Adhere the leaves to a Kool Tak Punch Adhesive sheet and trim to size. Peel the release sheet from each leaf and adhere it sticky side down onto a sheet of aluminum embossing metal. Trim around each leaf with scissors. Use the embossing tool to draw squiggles into the metal, pressing firmly. Glue the leaves to the paper flower stems with Kool Tak 3D PVA glue. 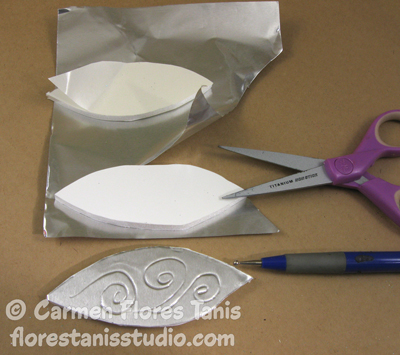
That’s it! You can customize this project by changing the color scheme or the words to match any holiday or occasion. And the shapes are simple enough that if you don’t have a die cut machine you can cut out the circles with a kraft knife. Remember making paper snowflakes as a kid? Well, you can do that same thing by folding and cutting Kool Tak Punch Adhesive Sheets with scissors to make your own unique snowflakes. Enjoy the holidays and stay warm!!! – Carmen