

Don’t you love fortune cookie fortunes? They are the original Twitter tweets delivering hopeful predictions, keen observations and lucky lotto numbers all in the space of a 2″x 1/2″ scrap of paper. I have a little jar filled with fortunes and to me they seem almost like little fairies or sprites whispering their gentle sentiments every time that I read them. I’ve pondered that little jar for several years now trying to figure out into what I could transform the fortunes. I finally figured it out! Rather than turn them into something different, why not just upcycle the fortunes into what they do best: wishing someone well. And with old refrigerator magnets glued to the back of each fortune, I now have a sweet gift ready to give to some lucky person!
This project uses a super fun technique of applying Kool Tak™ Shiny Transfer Foil Sheets to laser printouts.
Kool Tak™ Shiny Transfer Foil transfers quickly and easily to any dry, sticky surface such as a piece of tape, by simply applying the foil over the sticky tape and rubbing the top of the foil with your finger to get the foil to transfer.
In today’s project, we use a different technique to create a sticky surface from an otherwise non-sticky surface. You use an iron to heat up the ink from a laser print. The ink gets sticky and the foil magically bonds to it! It’s similar to the technique used in screen printing for applying metallics to fabric and to the method used in hot foil stamping which uses heat and pressure. Here’s how:
Materials / Tools:
Kool Tak™ Shiny Transfer Foil Sheets – “Holiday Colors”
Kool Tak™ Micro Dots Permanent Double-Sided Adhesive Dots
Laser print out of dragon clipart – I used Oriental Designs by Dover Publications
Hinged metal tin – “Altoids” size
Construction paper – red, black
Fortune cookie fortunes
Old refrigerator magnets (the smooth flat kind used by realtors and pizza parlors)
Charm – (I used a silver metal butterfly)
Iron, cotton towel or napkin
Scissors, decorative edging scissors, paint brush, embossing machine, embossing folder
Instructions:
Making the fortune magnets

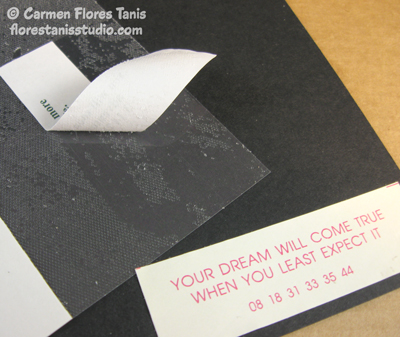
1. Remove one white release liner from a sheet of Kool Tak™ Micro Dots. Press a fortune cookie fortune onto the exposed adhesive dots then peel the fortune off the sheet. Press the now sticky fortune onto a sheet of black construction paper. Repeat with the remaining fortunes leaving about 1/4″ between each fortune.
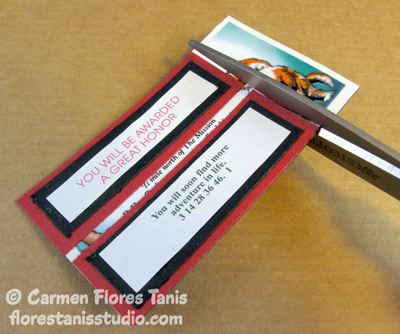
2. Cut the sheet of black construction paper apart so that there is about 1/8″ frame around each fortune. Repeat step #1 by applying the Micro Dots to the back of each fortune and adhering to a sheet of red construction paper. Leave 1/4″ between each fortune then cut apart so that there is a 1/8″ red frame around each fortune.
3. Repeat step #1 by applying the Micro Dots to the back of each fortune and then apply to old refrigerator magnets. Cut apart.
Note: Although you could use double-sided tape to bond the fortunes to the construction paper and to the magnets, the Micro Dots allow you to completely cover the back of your fortunes, even right into the corners (that you don’t want to see curl up), quickly and easily.
Foiling the Dragons & Text
4. This part is so cool! Turn your iron on to “Low”. You don’t need much heat for this technique. I like to use a smooth woven cotton towel or napkin as my ironing board with a sheet of white paper on top to get a really smooth surface. Selecting a clip art image of a small dragon, use a laser printer to print a black and white image on white paper – Ink jet won’t work! Place a sheet of the gold Kool Tak™ Shiny Transfer Foil, gold side up – grey side down, on top of the image. Take your iron and set it straight down onto the foil. Press down for one second and remove the iron. Try not to press on just an edge or the tip of the iron as that will give you streaks across your artwork.
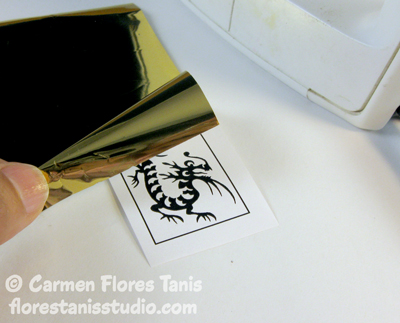
5. Carefully lift a corner of the foil and peek under to check that all of the black ink is now covered with foil. If not, fold the foil back down and press again with the iron. Peel the foil off to reveal the now foiled dragon! Save all the foil sheets because you can use every last bit of them.
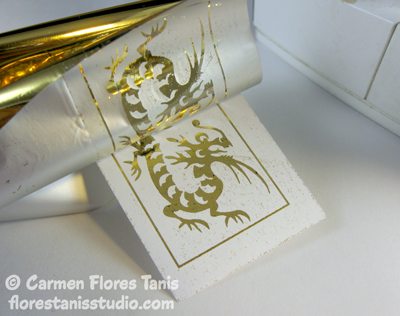
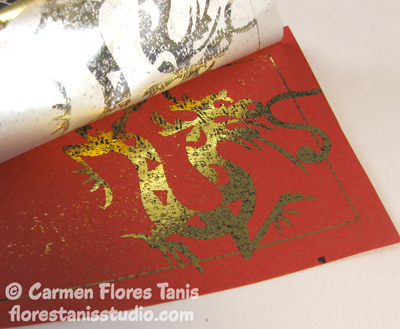
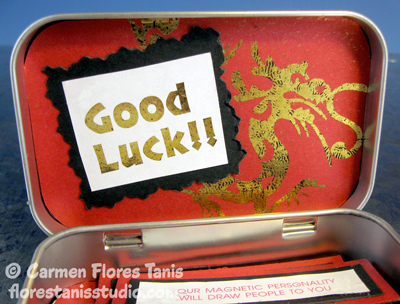
6. Print a larger dragon on red construction paper and repeat the above steps to apply foil. Cool huh?! Trim the red construction paper to fit inside the lid of the hinged box. Use Micro Dots to adhere.
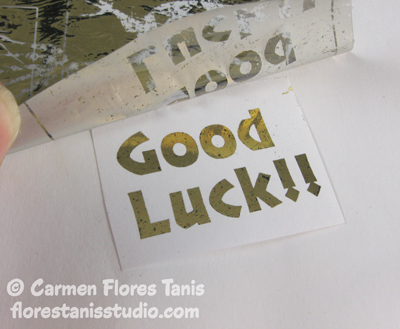
7. Print the words “Good Luck” on white paper and apply foil as above. Trim with scissors.
Assembling the box:
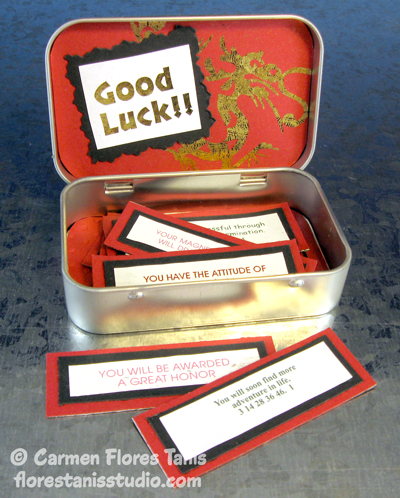
8. Use Micro Dots to adhere the “Good Luck” piece of paper to a small square of black construction paper. Trim with decorative edging scissors and adhere with more Micro Dots to the red dragon already on the inside lid of the hinged box. To add a nice touch, cut a piece of red construction paper to fit on the inside bottom of the box and glue it in place with Micro Dots. Place the fortune magnets inside.
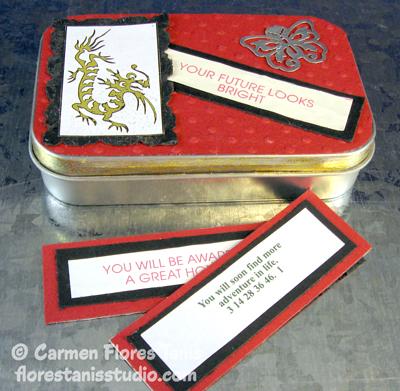
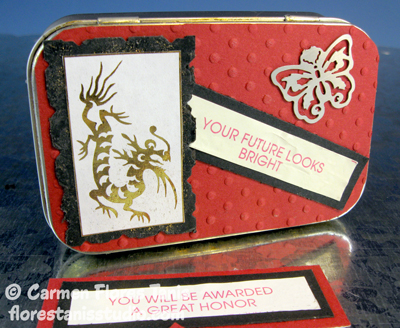
9. For the lid, use the embossing machine and embossing folder to add some texture to a piece of red construction paper. Cut to fit onto the top of the lid. Adhere with Micro Dots. Attach a fortune framed with black construction paper. Cut a piece of black construction paper to go behind the small gold foiled dragon. For a pretty mottled gold effect, brush a little Kool Tak™ 3D PVA glue on the black paper sparingly, let dry a couple of minutes until clear and tacky, then apply gold foil. Attach the dragon with Micro Dots to the black paper and use the decorative edging scissors on the edges. Attach to the box with Micro Dots. Finish off by adhering a butterfly charm to the top corner with Micro Dots. (Micro Dots are perfect for attaching lacy, intricate shapes!)
10. For one last hint of gold, brush 3D PVA glue all around the outside metal edge of the lid, let dry until clear and tacky, then apply gold foil.
These little boxes would make fun favors for parties and weddings. You could even make up your own fortunes and wishes. And foiling laser prints is so much fun that once you start playing with foil, I promise that you ‘ll agree that Kool Tak™ foil is awesome!
I am OBSESSED with Fortune Cookie Fortunes! I Must have one of these! Such a great tutorial:)
Happy you liked it! Thank you for your comment!
Love this idea for a great way to make use of all of those Chinese take out fortunes!
Hi Beth!
So happy you liked it! And you know that everyone has at least a small pile of fortune cookie fortunes just waiting to be so easily transformed! 🙂
Love the new technique with the foils. How COOL is that!!!
We are always trying to give useful info to our readers. We are happy you liked the technique and feel free to share some of your own with us. We love new ideas!
Hi Alessandra! I’m so glad you like it! Once you start playing with KoolTak foils you won’t be able to stop! 🙂