

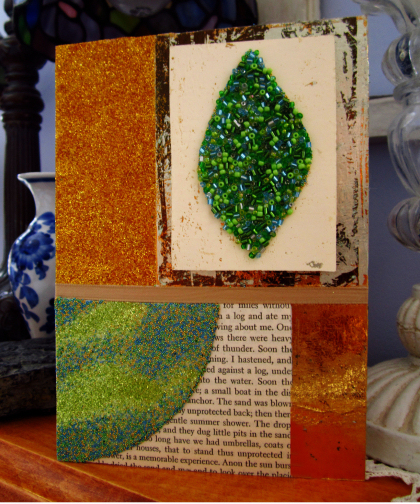
I am always coming up with handmade card ideas. Last week I showed you how to make a Contemporary Card that had more of a masculine feel. This week, I am going to show you how to take that card and change it up to give it a more feminine feel. I love building over other structures. It gives a project so much texture.
So…just to be clear…in order to make the following card, you will need to make the base first. You can find the directions for that by clicking here: Contemporary Cards Part One.
Materials
- Completed Contemporary Card Part One (which is our Base Card for this project)
- White cardstock: 4 by 5-inch, 3 by 3 3/4-inch
- Kool Tak™ Premium Extreme 6” Tape
- Kool Tak™ Layer Plus
- Kool Tak™ Green Sparkles
- Kool Tak™ Vintage Tones Foil
- Kool Tak™ 1/4-inch Foam Tape
- Leaf pattern
- Craft paper (for pattern)
- Paper needle tool
Instructions
1. Place the Kool Tak™ Layer Plus onto the 4 by 5-inch cardstock so the inside corner hole is in the lower corner of the cardstock and each edge measurement is 3 inches. Make sure the edges of the cardstock line up with the guidelines on the Layer Perfect.
2. Use a low-tack masking tape to hold the cardstock onto your work surface.
3. Place a fine-tip maker into the left side of the Layer Plus at the 3-inch mark (B) and then place a paper needle tool or other sharp tool in the hole (A) that is in the lower corner of the Layer Plus. With the marker still in the 3-inch hole, draw the marker to the right side of the cardstock to create a wedge.
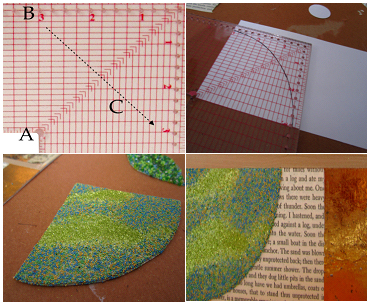
4. Cut out the wedge and cover it with the Premium Extreme 6” Tape and then remove the excess tape. Place the Premium Extreme 6” Tape on the back of the wedge and remove the excess tape. Turn the wedge right-side up and remove the protective over the tape with the micro beads. (left) Press down on the beads to secure them to the tape. Remove the backing tape from the back of the wedge and secure the it to the left-lower corner of the Base Card. (right)
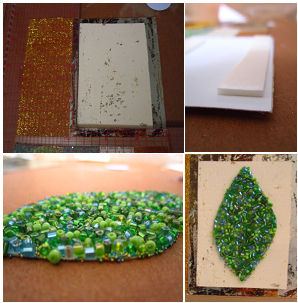
5. Place the Premium Extreme 6” Tape onto the 3 by 3 3/4-inch cardstock and then remove the excess tape from the cardstock. Remove the protective cover from the tape and then apply the off-white foil over the tape. Cover the same area with the gold foil to cover any remaining exposed areas of tape. (left) Secure the Kool Tak™ foam tape onto the back of the off-white foiled cardstock. Use the Kool Tak™ Layer Plus tool to place the off-white foiled cardstock onto the upper-right corner of the Base Card.
6. Print and cut out the leaf pattern.
7. Measure out a 3 by 3-inch square piece from the 6-inch tape. Use the leaf pattern to cut out a leaf from the square piece. Apply the threading beads onto the tape. Press the beads down to secure them into the tape. Place the micro beads over any open areas on the tape and remove the excess beads. (left) Remove the backing paper from back of the beaded tape and secure the beaded leaf onto the off-white foiled paper on the Base Card. (right)
I hope you’ve enjoyed these handmade card ideas I’ve shared with you over the last few days. I’d love to know…where do you get your inspiration for cards and other crafty projects. Leave a comment below and share with us.
This is such a cool idea! I love glitter and believe that it should be used on EVERYTHING! What do you get when you add Glitter + Kool-Tak? =Glittericiousness!
I can tell that Kool-Tak and I are going to have a long and meaningful relationship! Keep the awesome ideas coming please!
LOL Barbara…love the new word you invented! Thank you for your comment.