
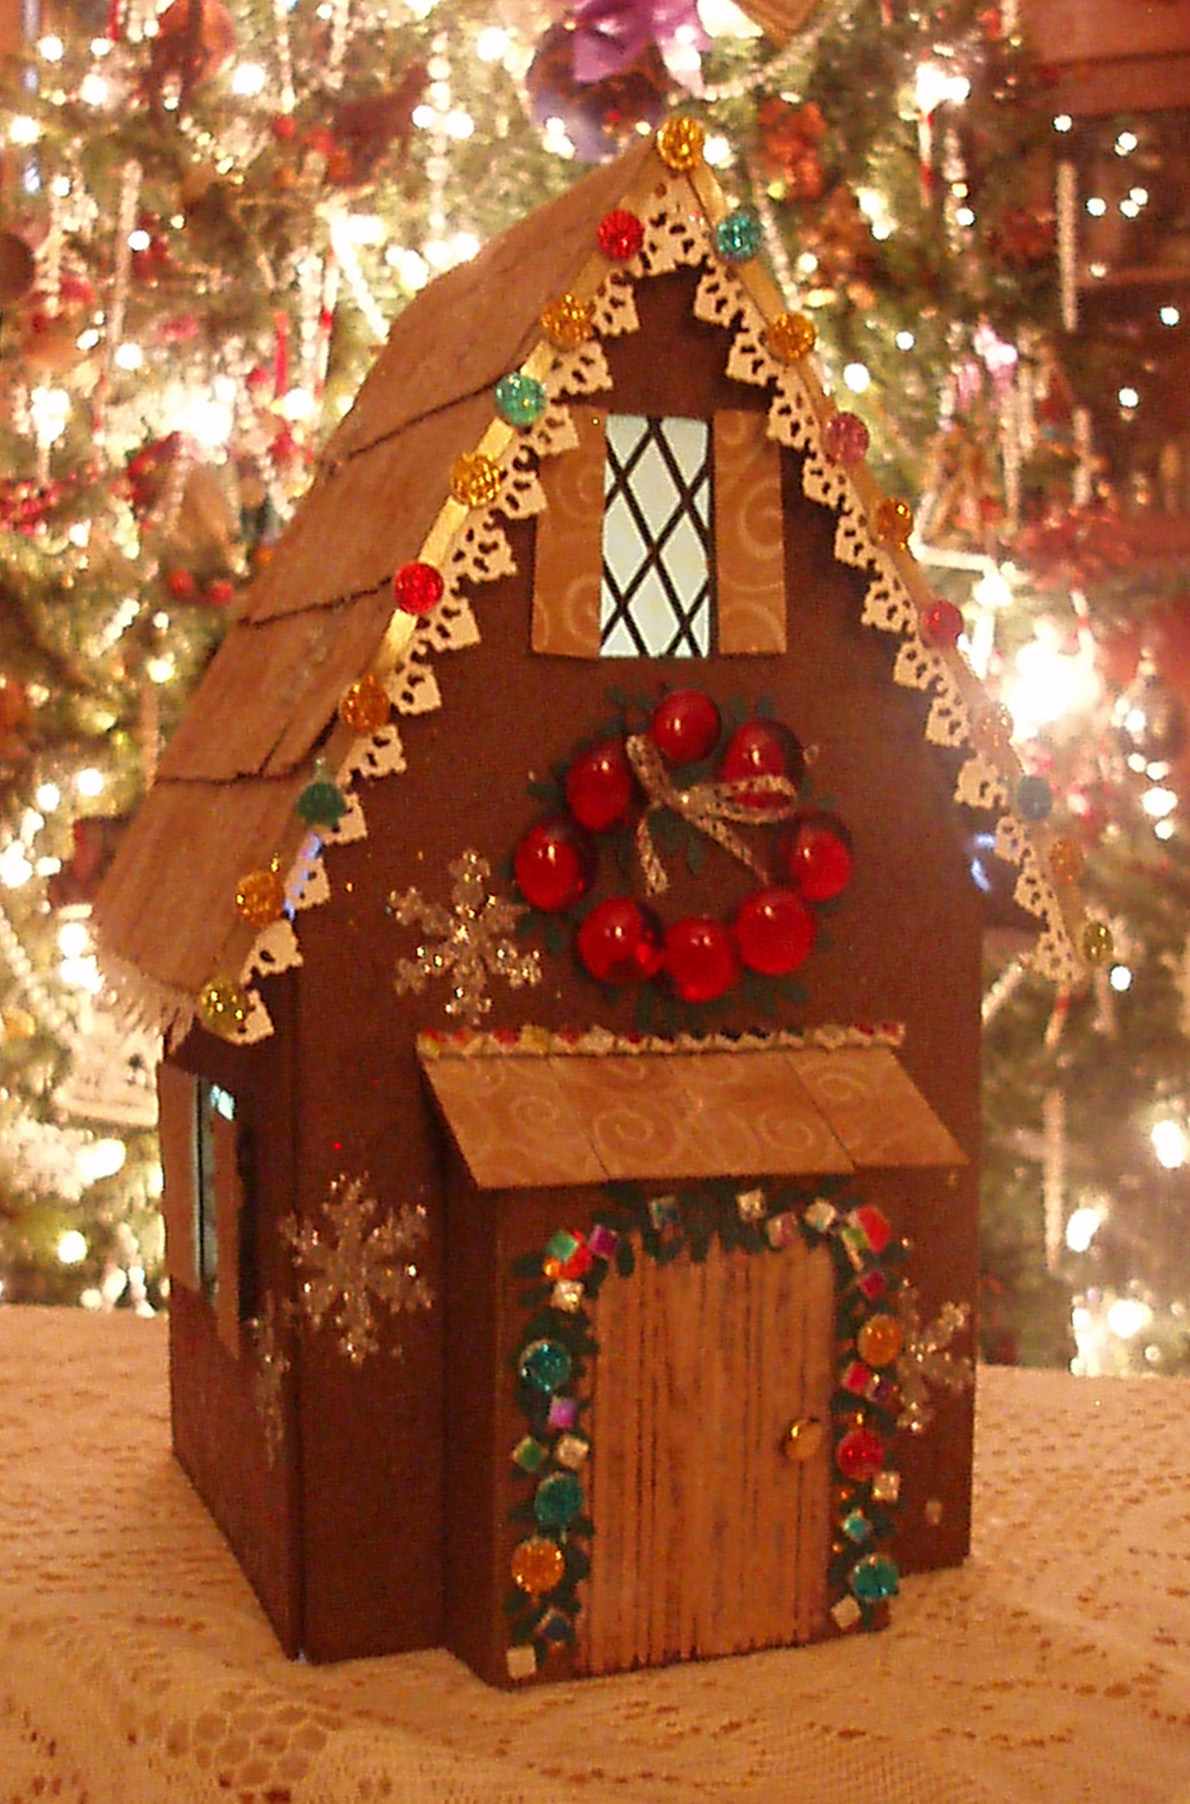
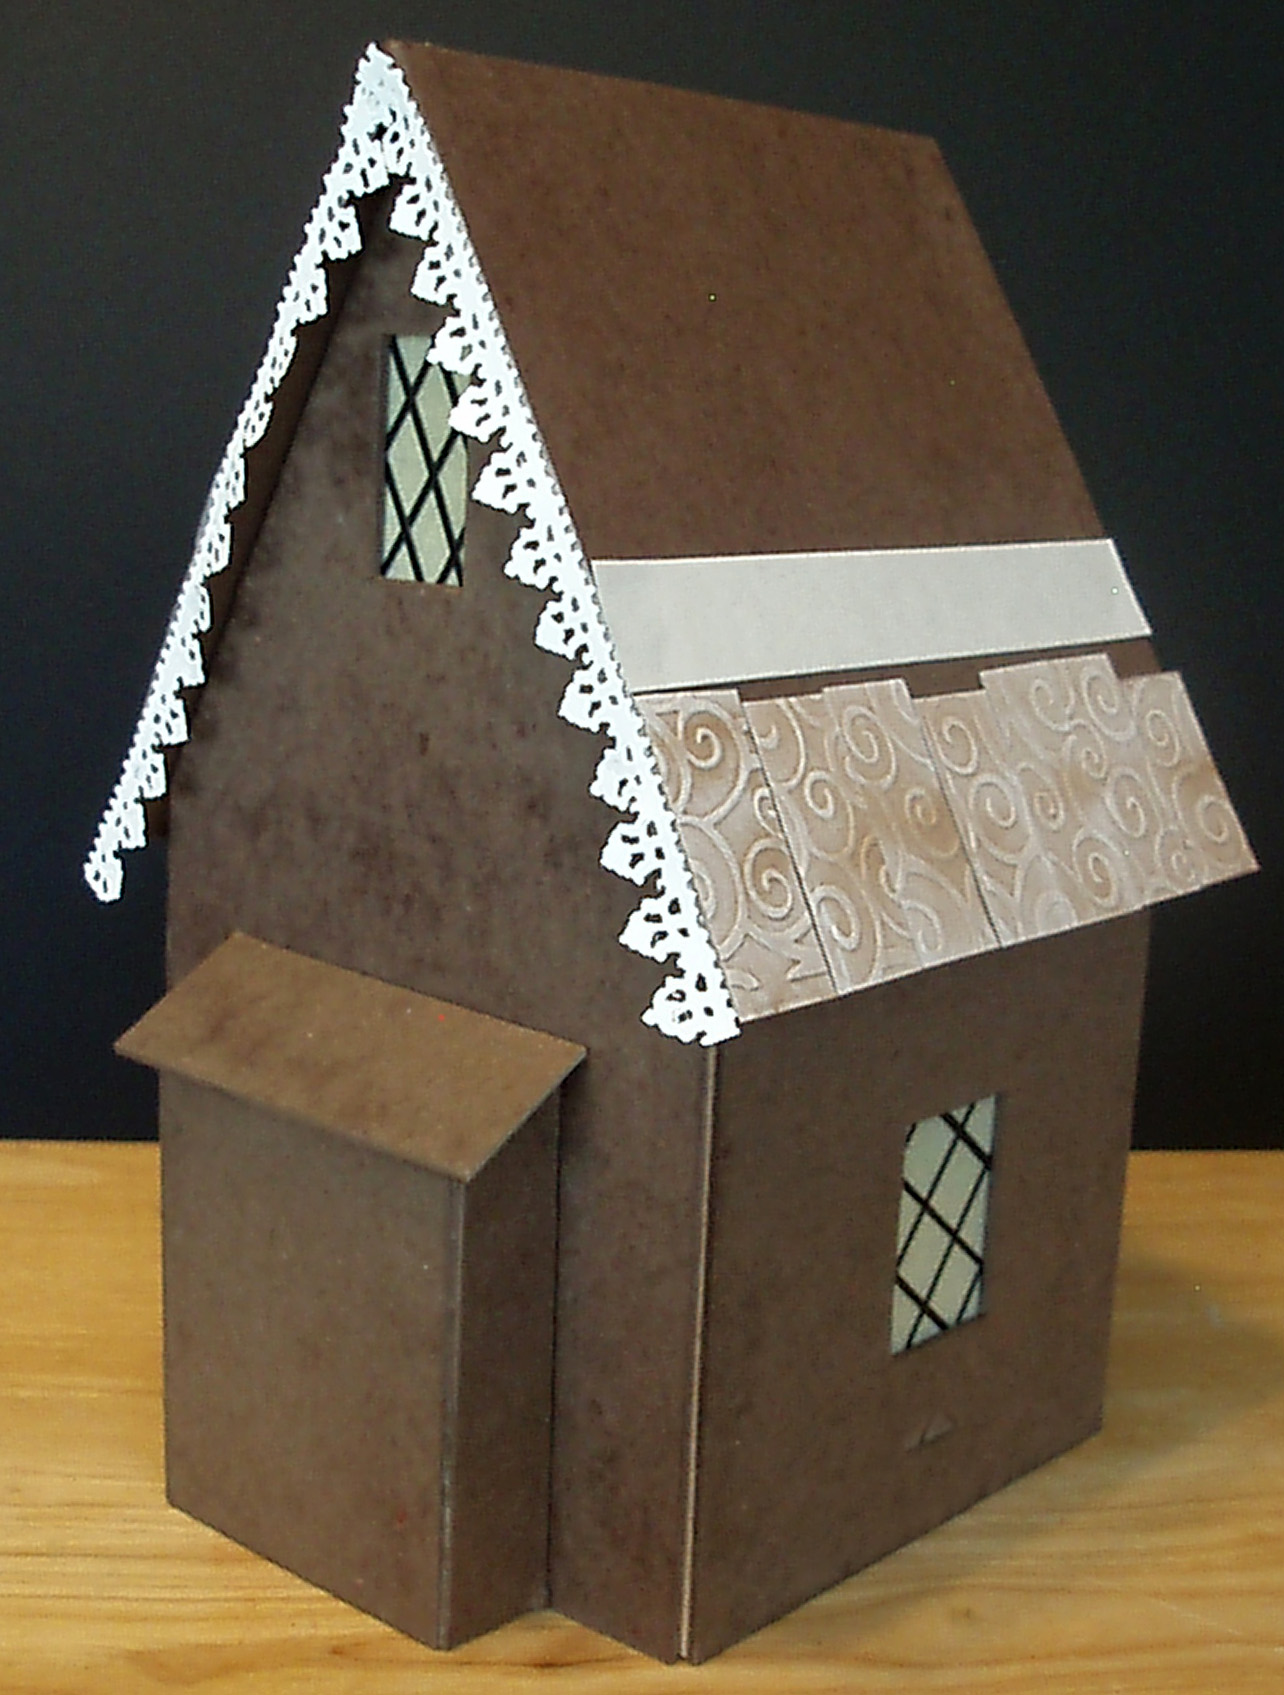
This Christmas Cottage is well worth the effort required to make because it will last a for many Christmases to come.
What is a child’s Christmas without a gingerbread house?
This project was totally different in my mind. I had planned to use actual candy and cookies, but about one third of the way through the preliminary sketches, I discovered that I was really going to like this piece and I wanted it to be something that would last from year to year. Stored in my country garage, there would be all kinds of critters after those sweet treats.
When I began to experiment with some of my favorite tried and true KoolTak adhesives, I began to look at them differently. I am totally in love with KoolTak Premium Extreme. I holds really tight, is embossable and can be easily torn, so no juggling with scissors required. I also explored more of my KoolTak stash, bringing out a couple of things that I had not tried before.
I learned the basic house construction method several years ago in a class. I wish I could give you the name of the person who taught the class, but I have no idea. If you are the person who originated this construction method, let me know, and I’ll happily give you credit.
Here’s how I did it:
-

All it takes to light up the night is a tap light or small flashlight placed under the Christmas Cottage.

Supplies
- Kool Tak 3D Foam Roll, ½” – Black
- Kool Tak 3D Foam Roll, 3/16” – Clear
- Kool Tak Artist Tape, ¼” – Black
- Kool Tak Premium Extreme 1”
- Kool Tak Premium Pro ¼” and ½”
- Kool Tak Ultra Clear Sheet 8’ x 10”
- Kool Tak 3D Glue – Embossing Effect
- Kool Tak Assorted Sparkles Fine Glitters
- Kool Tak Shiny Transfer Foils – Mardi Gras
- Kool Tak Shiny Transfer Foils – Vintage Tones
- Kool Tak 3D Foam Pads ¼” squares – White
- Kool Tak 3D Foam Pads 3/8” Circles – White
Note: This project could have been made using only Ultra Clear Sheets or 1” Premium Extreme for the construction adhesives. I used several in different sizes to avoid the time necessary to having to cut each one to a custom size.
- Matte Spray Paint, Leather Brown (Krylon)
- Card Stock, White and Dark Green
- Chipboard, 8.5” x 11”, Three Sheets
- Book Board or Mat Board (Crescent): 6” x 6” (2), 6” x 12” (2) 15” x 7” (1), 5 3/8” x 5” (1) and 3 3/8” x 1 ½” (1)
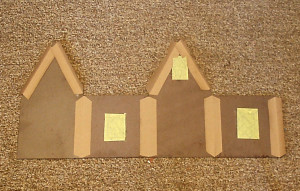
Note: The two 6” x 12” panels need to be cut to form the pointed roofline. Mark each side at 6”. Use a straight edge to draw lines from the top center to the 6” mark on either side. (See Diagram 1) Trim away the excess before you paint. 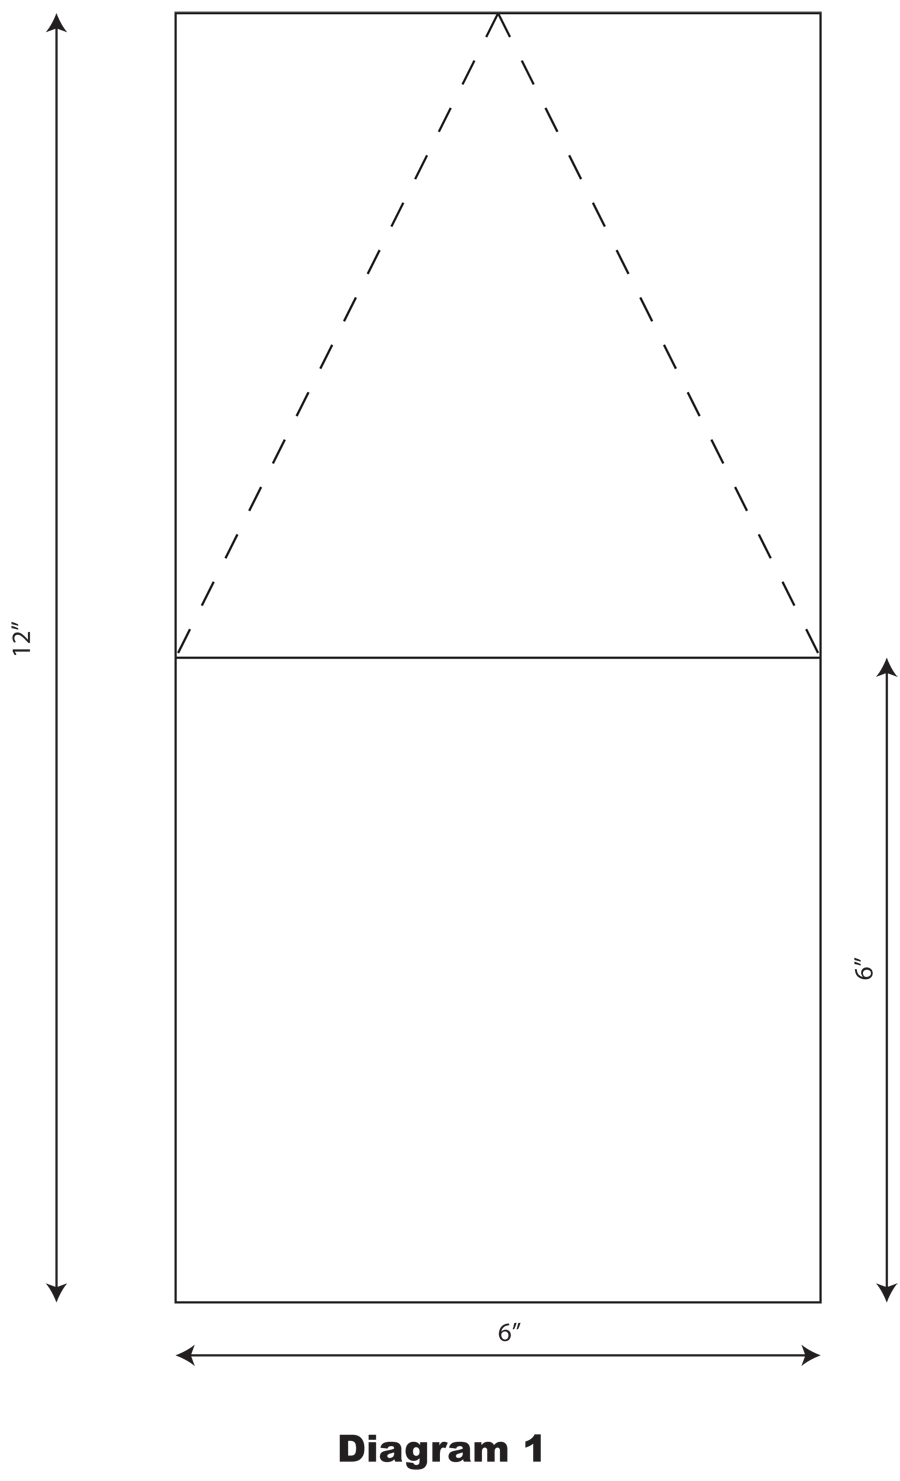
For the roof, mark the center of the 15” x 7” piece of book board in the middle at 7 ½”. Using your craft knife, cut along the line, but do not cut all the way through. Bend it along this line to form the peak of the roof.
- Big Shot Die Cutting Machine (Sizzix)
- Dies: Sizzlits Decorative Strip Die, Vintage Lace; Movers and Shapers Magnetic Die Set, Mini Snowflakes (Sizzix)
- Texture Dies, assorted patterns and manufacturers
- Transparency Film
- Tissue, Yellow, 6” Square
- Punch, Leaf Design (Martha Stewart)
- Floral Pebbles, 6, Red, 1” Diameter
- Kraft Paper, Heavy Duty, or Large Paper Grocery Bag
- Thin Silver Ribbon, 8”
- Pearl Corsage Pin
- Dimensional paint, Pink (Viva Décor Paper Pen)
- White Pen, (Signo)
- Brown Dye Ink , Vintage Photo, (Tim Holtz for Ranger)
- Pigment Ink, White
- Tap Light
Tools: Scissors, Craft Knife, Decorative Edge Scissors
Directions
- Cut out the windows in the front and side pieces of the house. They are approximately 1” x 3”. Spray all book or mat board pieces front and back with brown paint. Apply a second coat if necessary.
Windows
- Cut three pieces of transparency film 2” x 4” (or 1/4″ larger all around than your window opening.) and apply Ultra Clear sheet adhesive to each piece. This adhesive will make your windows look more realistic than if you used several pieces of 1″ tape. Peel away the release paper and apply yellow tissue to the film. Flip it over so the shiny side is up. Cut an 8” strip of ¼” black Artist Tape into three strips lengthwise. Place the pieces in a diagonal pattern on the film. Apply ¼” Premium Pro adhesive around the windows on the inside of the house, applying them right up to the edge of the window, trimming if necessary. Turn the window pieces back over and adhere them to the window, shiny side down.
Front Door Assembly
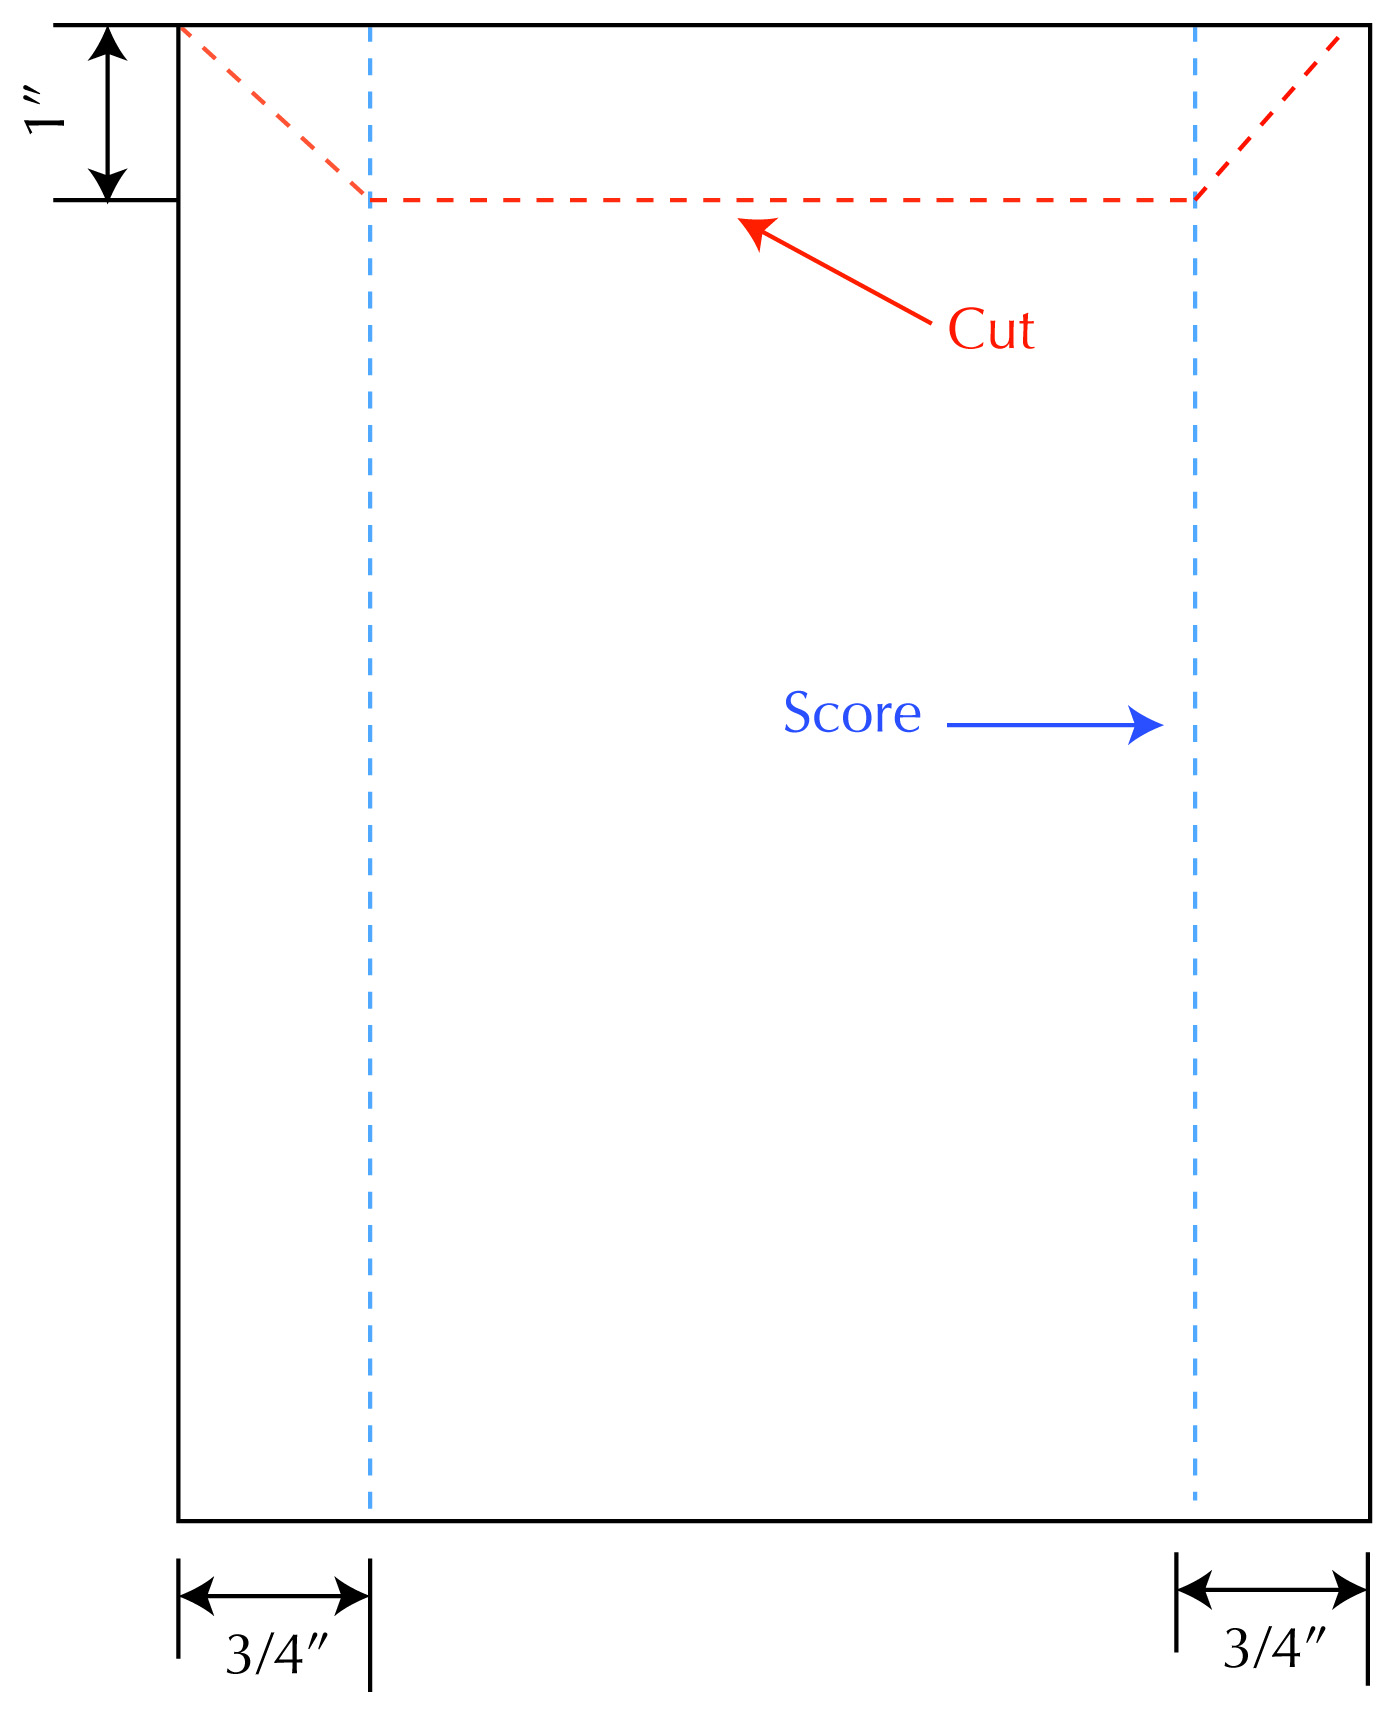
Diagram 2
- Cut angles from each top side of the 5 3/8” x 5” piece of book or mat board (See Diagram 2). Draw a line 1” from the vertical edge on each side of the 5 3/8” x 5” piece of book board. Score lightly (one pass should do it) along each line and fold each flap to the back.
Assembling the House
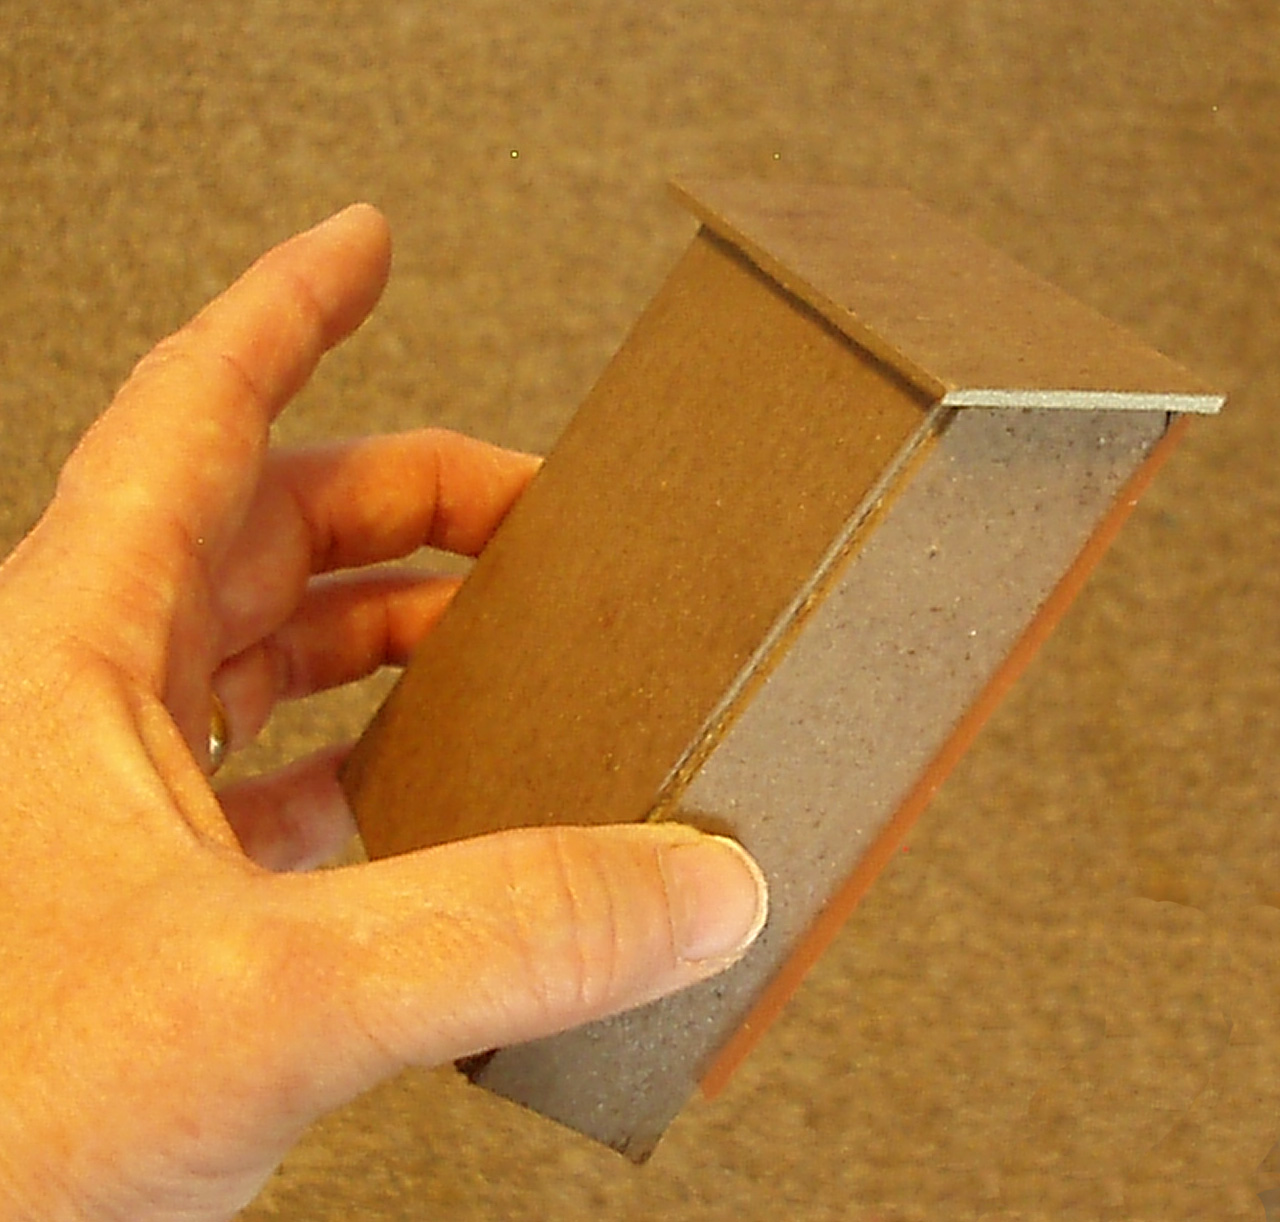
- Fold two strips of kraft paper, 24” x 2”, to 24” x 1”. Cut into 6” strips and trim corners 45°. (See Diagram 3) Apply 1”Premium Extreme to each side of the joint hinge pieces, placing it as close to the fold on each side as possible.
- Lay the house pieces out in this order: 6” square, 6” x 12” piece, 6” square and 6” x 12” piece. Make sure the edges are tight against each other.
- Place the folded edge of each joint hinge piece along the seams between the book or mat board pieces. At the end, apply the
Apply joint hinges as close to the lines between each piece as possible. The ones at the top will be used to attach the roof.
joint fold on the edge, then fold the house up to join the last edges. Press all the adhesive down securely.
- Attach four joint hinge strips to the angled edges of the house top. Center the roof front to back over the pointed top and adhere with the open sides of the joint strips. Press all the adhesive down securely.

Shingles
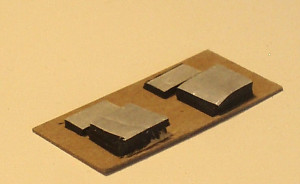
- Run kraft paper through a die cutting machine using a texture plate. Using 1” Premium Extreme adhesive , attach the textured paper to thin 4 ¼” x 5 ½”chipboard sheets. You will need approximately 8 pieces of chipboard/kraft paper pieces. Apply the white ink pad to the textured paper. Trim each piece into 1” x 2” pieces.
- Apply a strip of 1” Premium Extreme approximately ½” above the bottom of the roof. Place seven shingles across the bottom, overlapping the bottom edge about ¼”. Apply the Premium Extreme 1” above the top of the shingles. Trim one shingle to ½” x 2”. Begin the second row with the half shingle, applied over the first row about 1/4”, and apply six more whole shingles, then add the other half shingle at the end of the row. Repeat this two more times, alternating 1” to ½” beginning shingle each row until you reach the roof peak. Don’t worry if the shingles don’t come all the way to the top. Repeat for the other side of the roof.

Apply Premium Extreme about 1/2 inch above the top of the row of shingles.
- Fold a strip of 8” kraft paper and trim the length with decorative scissors. Rub the white ink pad over the kraft paper, particularly along the edges. Use ½” Premium Pro to attach it on top of the roof line.
Stack the foam adhesive on outer edge to give the shutters a little added character.
- Use the remaining shingles to create shutters for the windows. Place one strip of Black Foam to one edge of each shingle, and stack two on the opposite edge. Attach the shutters to the house with the single strip on the window side. This will give an appearance of the shutters just having been pushed open from the wall. For the front window, cut one shingle in half vertically and attach it with one strip of black foam.

Attaching the Front Door
- Fold the side flaps to the back. Place the joint hinge strip at the top of the door base, with the fold on the edge. Cut a piece of chipboard approximately 3” x 4” across the back of the door and secure it with the open side of the flaps.

Completed door assembly. Attach to the house with Ultra Clear.
- Apply a piece of the Ultra Clear Sheet to the back of the door assembly and attach it to the house. Apply ¼” Premium Pro along the angled edge a the top of each flap and, using thejoint hinge piece, adhere the 3 3/8” x 1 ½” piece of book or mat board to the top. Place shingles across theangled piece using 1” Premium Extreme.
Creating the Door Shape
- Cut a piece of kraft paper a little larger than 3 x 3 ¾”. Run it through the die cutter with a stripe texture plate. Cut a strip of chipboard approximately 3 x 3 ¾”. Attach the patterned kraft sheet using 1”Premium Extreme. Usea circle template or the center circle of a large roll of tape to mark a curve along the top of the door. Trim away the excess. Rub Vintage Photo ink and white pigment ink over the ridges of the door. Attach 1” Premium Extreme to adhere the door to the front door assembly. Remove the shank on a gold brad and attach it to the door with a small folded piece of Ultra Clear or Premium Extreme.
Trimming it Out
- Punch leaves from dark green cardstock. Apply ¼” Premium Pro to each side of the door. Place the punched leaves along the tape. Apply Mardi Gras foil to small 3D Foam squares and Sparkles Glitter to Foam 3D rounds. Arrange the dots and squares along each side of the door.
- Cut lace trim from white card stock using the Vintage Lace die and attach it along the front roof lines with ¼” Premium Pro adhesive. Apply gold foil to a piece of Clear Foam Strip and attach it along the front roofline. Glitter more Foam 3D rounds and attach them along the front roof peak.
- Cut snowflakes from Ultra Clear sheet using snowflake die. Remove the release film/paper and apply the snowflakes randomly over the house sides and roof. Remove the remaining release film/paper and sprinkle silver glitter over the snowflakes. Tap the sides and roof while holding the house upside down over a large piece of paper to remove any excess glitter.
Finishing Touches
- Apply dots of 3D Glue randomly over the house. Add Sparkles Glitter or Silver Foil to suggest snowflakes.
- Use the white pen to draw rough twigs on the base of each side of the house. Apply dimensional dots with a pink or red Pearl Pen.
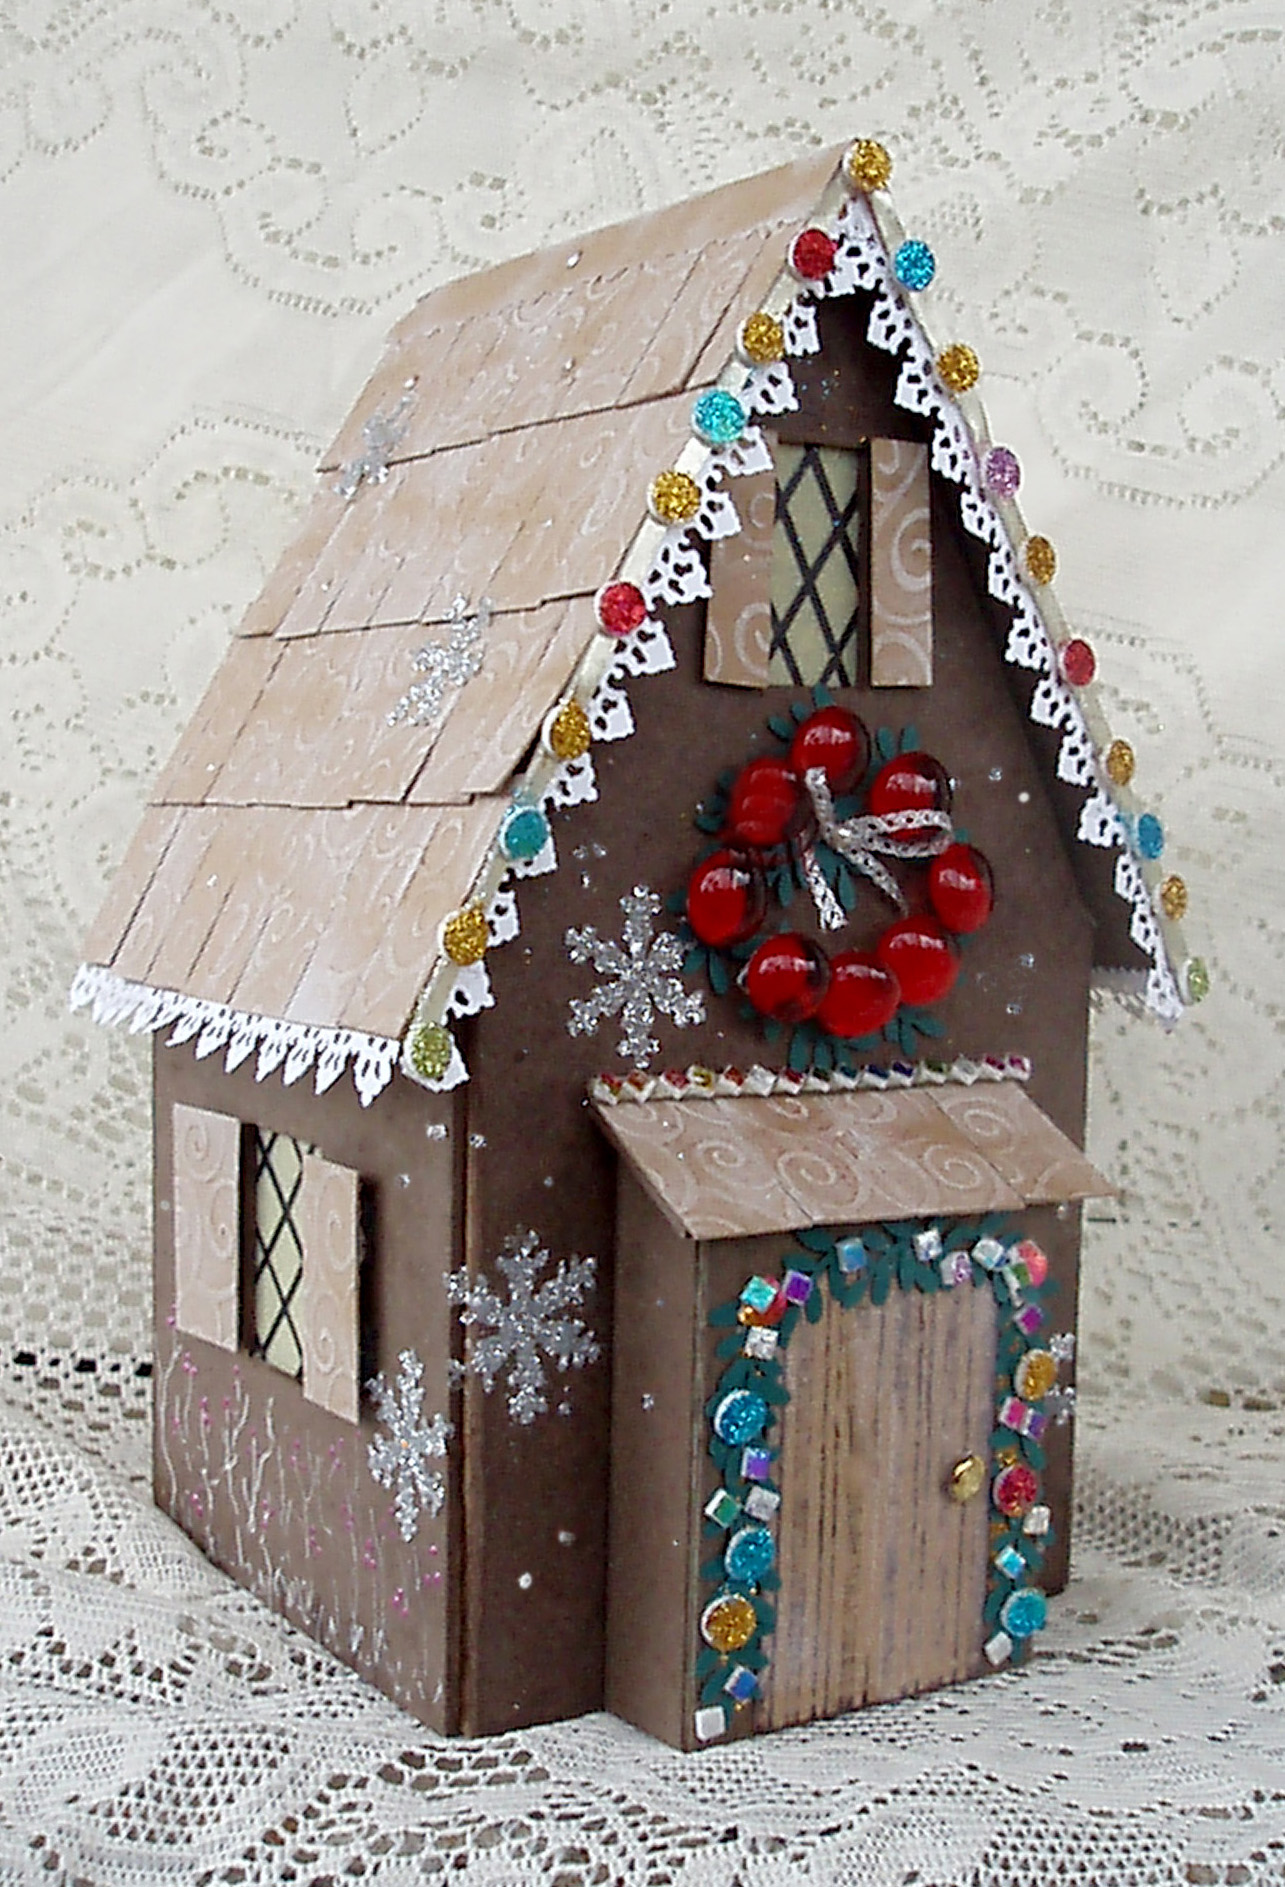
- Punch more green leaves and apply in a circle below the window on the front. Apply Foam Rounds to red floral pebbles and attach over the leaves to make a wreath. Tie a tiny silver bow and use the pearl corsage pin to attach it to the wreath. The book board is not easy to get through, but with a little patience and effort it will work.
When you have finished, just place a tap light under the house and the windows will glow.
This is not a project that can be done in a hurry, but it will be beautiful for years to come. It could also be adapted as a summer cottage to become a nightlight in a child’s room. Just change the glittery rounds to swirl die cuts to add vines along the door and roof line and use the foil on the round and square dots to suggest flowers.
I hope you enjoy your faux gingerbread house as much as I plan to enjoy mine, and that it will bring you happiness each time you remove it from the storage box. Merry Christmas! Enjoy – Candice